March BarkBox Review!

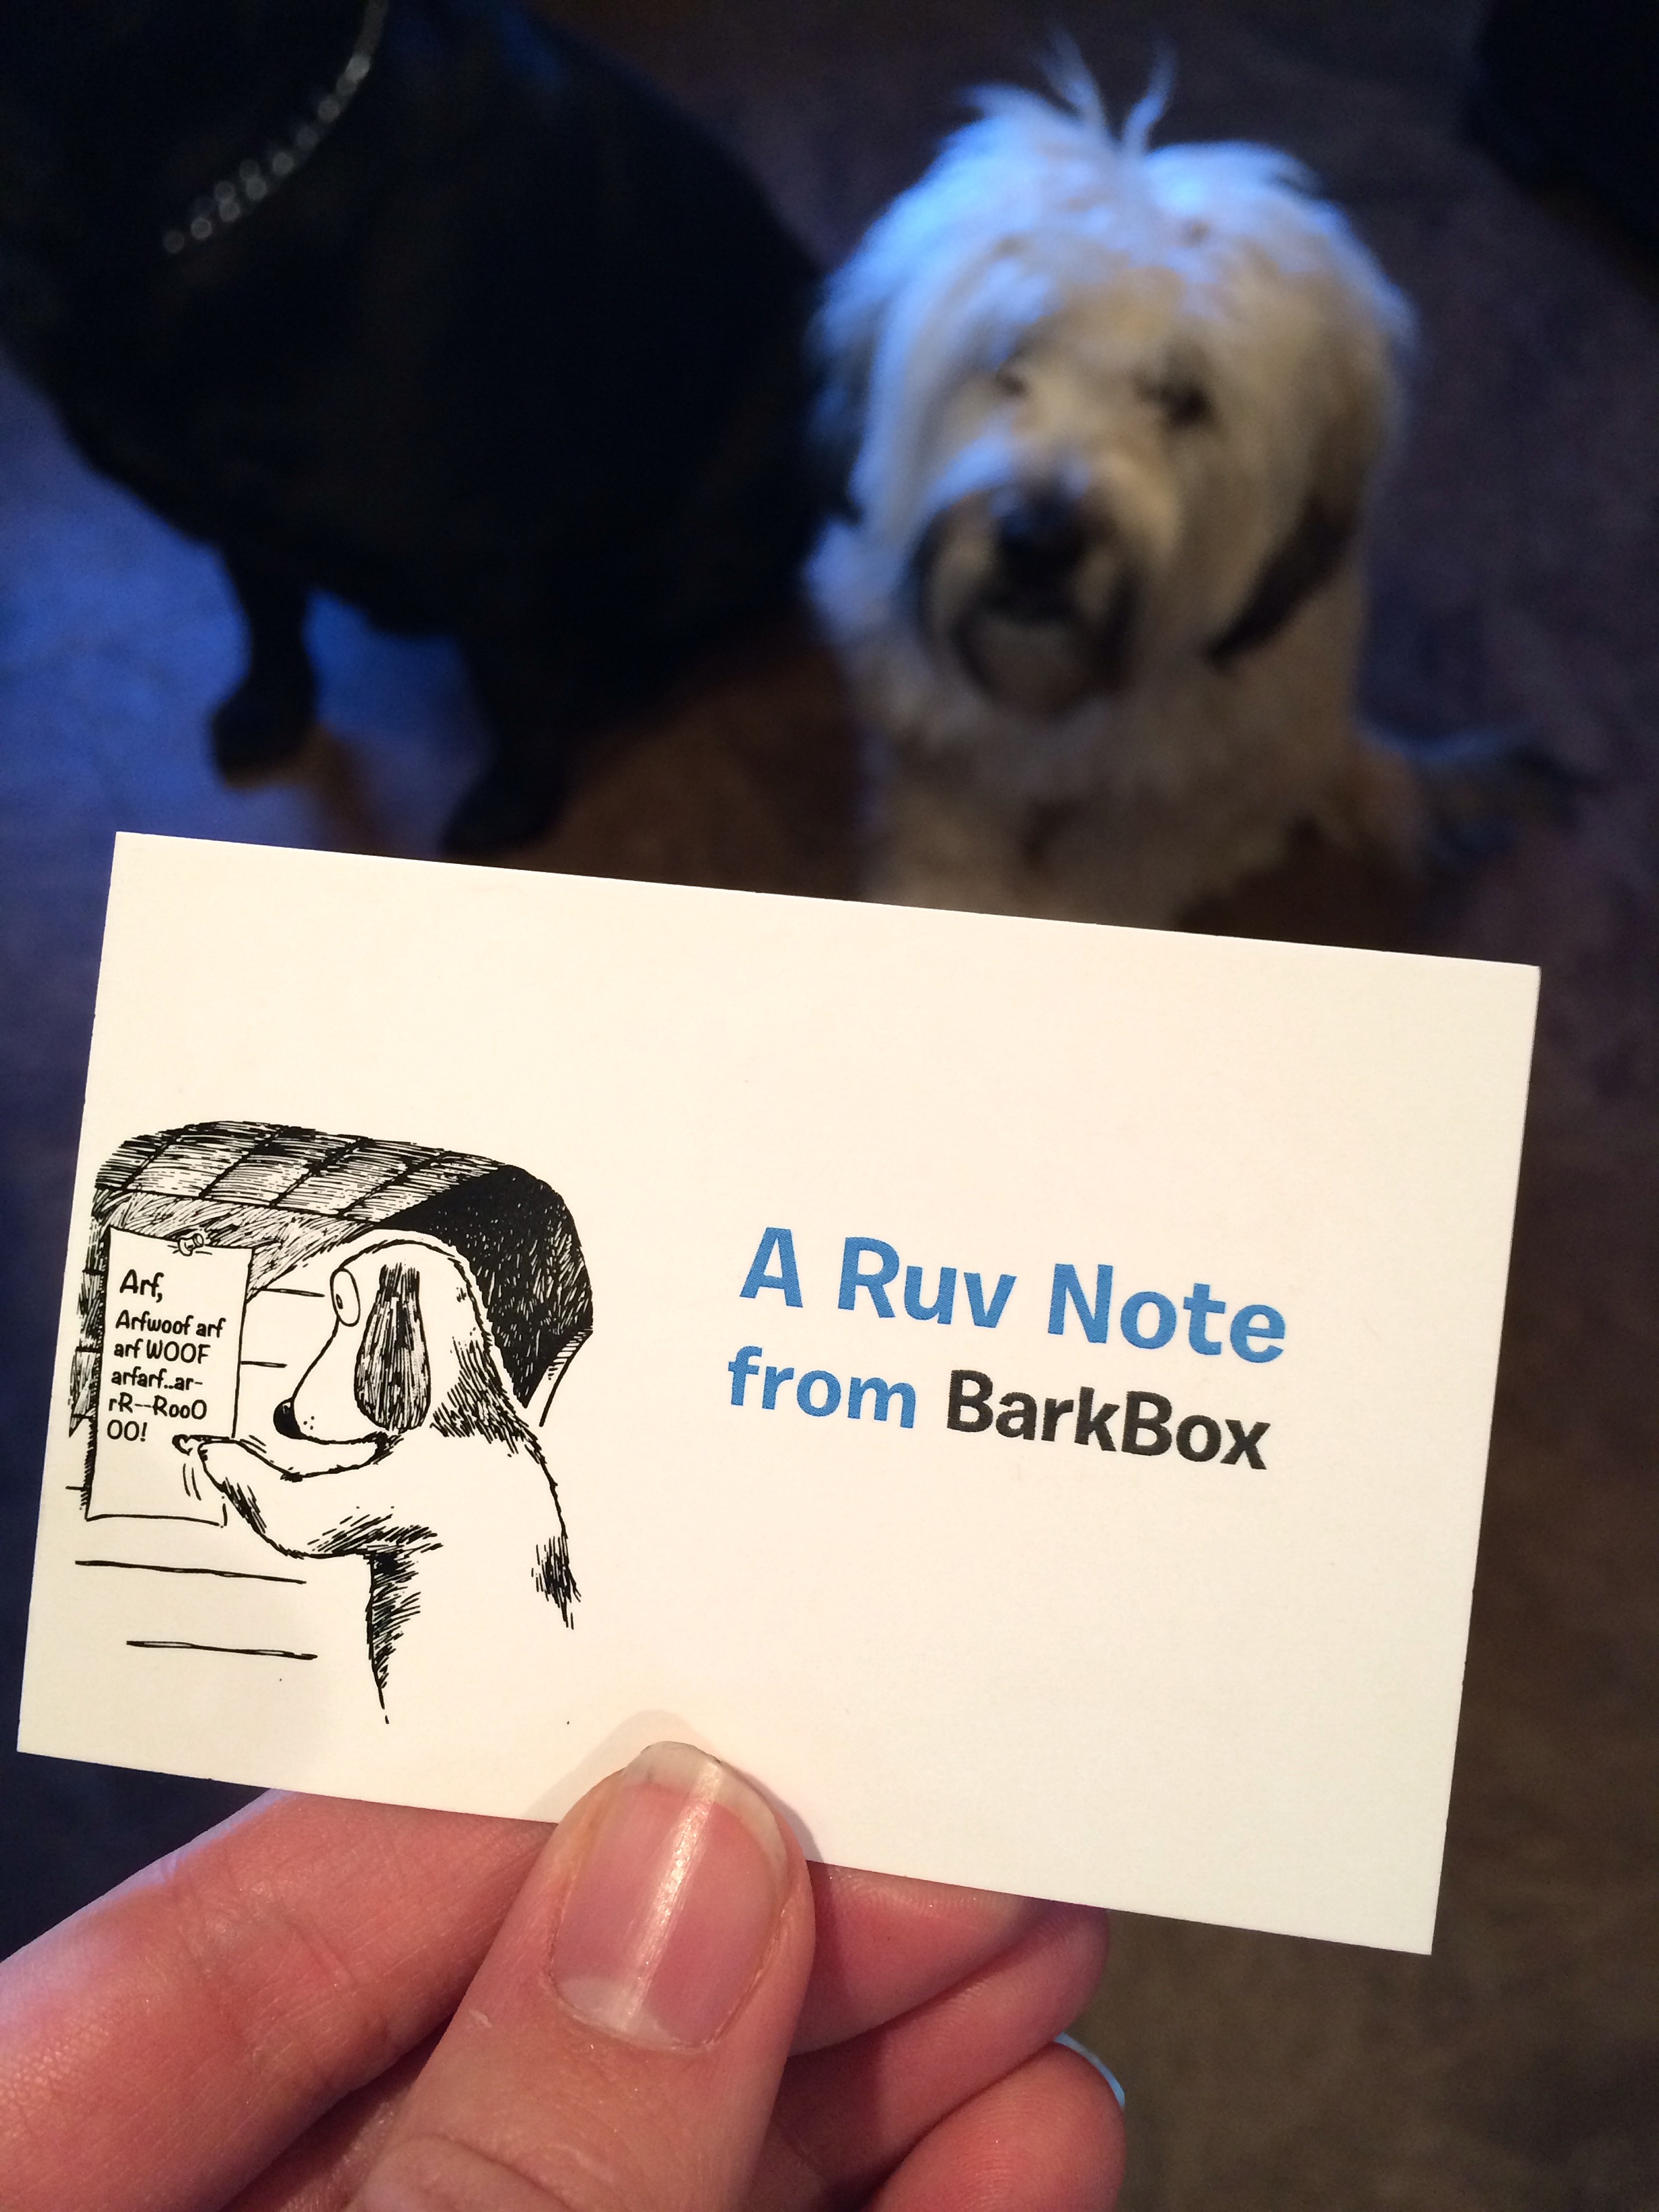
It arrived! BarkBox has entered the building. Yes, we really are that enthused over our monthly gifts. This month was no disappointment. (surprise, right?) This month’s box was inspired by the most important meal of the day; it’s breakfast! I couldn’t wait to open it up and rummage through all the goodies. Halt! First I (more importantly Ani) was greeted with a ruv note. This BarkBox never ceases to amaze me. Once we read our ruv note, which I’ll have photographed below, we began removing the items one by one. Love it, love it, love it, really love it, and of course love it. It’s safe to say we were completely and utterly pleased.

barkbox march 3

barkbox march

barkbox march 2

If you’re not sure how BarkBox works check out my January BarkBox review! I go in depth about what BarkBox is all about and how to get your pet started! I would recommend it to anyone. I love gifts and so does Ani – these are the best kinds too. You never know what you’re going to get. Surprise! It also makes a great gift for an animal lover. That’s how I got started!

barkbox march 4

The items:

Although it didn’t last as long as I’d wished it had, Ani says it was worth it. This leather toy is made to look like a piece of bacon! It also has a lovely squeaker inside which is super exciting to Ani. This bacon toy made by Aussie Naturals is 100% natural, eco friendly, and made with rescue tested leather and coconut fibers. I’m sure it would’ve lasted longer with most pups, but I own destructo puppy! Overall, she loved it!

I’m very impressed with this toy. This toy, made by Safemode, was interesting because it had many qualities. This bone shaped toy is:

-oven and freezer safe
-safe for your entire family
-tested to children’s toy safety standards
-free from cancer-causing chemicals, phthalates, and BTA
-made from durable, yet flexible food-grade, non-toxic silicone
-dishwasher safe and bacteria resistant

It’s hard to believe one dog toy can have so many beneficial qualities. There’s no chance of bacteria, which is expressed as a real concern today. It’s pleasing to know that our animals, especially, our dogs are being protected from hazardous chemicals and materials. I’m thrilled that pet industries have cleaned up the quality of their merchandize in order to keep our families best friends safe. This toy is a total winner in my eyes.

Treats! Hurray! Ani says thank you Wagatha’s for these delicious organic breakfast biscuits. They’re wheat-free, lactose-free, and are made with ingredients like apples, bananas, and cinnamon. If there wasn’t a little smiling dog on the front of the box I would probably eat one myself! They sound scrumptious.

Ani is one lucky girl because there are more treats! This is the best part of the box, right? Ani wants to thank Happy Howie’s for the tasty sausage link goodies! These treats are great. They’re made with real turkey and best of all – NO corn, wheat, artificial colors or preservatives. A healthy treat you’ll feel good about giving your dog.

BarkBox isn’t skimpy with their treats, which Ani appreciates. Have you ever enjoyed salmon for breakfast? Well your dog is about to. Baker’s Best has created Wild Pacific treats that are made with real salmon and glazed with a maple-blueberry compote. I think my dogs breakfast themed treats sound better than my breakfast! Spoiled pups!

barkbox march 5

Ani had a fabulously festive St. Patrick’s Day! We hope you all enjoyed it as well. Enjoy the rest of your March month!

For our fellow cold weather pups – stay warm!

Bayley & Ani

S’more Cupcake

These cupcakes are a super simple recipe with a unique twist. The graham cracker cake is flourless – strictly made with graham cracker crumbs instead of flour. Very interesting. At first I was hesitant because I’ve never tried baking without my beloved flour. I anxiously watched through the oven window wondering if this recipe was a goner. It’s safe to say I was pleasantly surprised. The cupcakes plumped up perfectly.. Almost too perfect, which made me suspicious. Are they as great as they look? Did I mention they smelled delicious? I was just about ready to sink my teeth in this cupcake when I realized I almost forgot the frosting. What’s a s’more without the marshmallow? This marshmallow frosting created some kind of s’more perfection. I lathered up a graham cracker cupcake and finally tried this creation. Yes, it did taste as great as it looked. It was much lighter than your typical cupcake, which was nice for a change. It was airy, flavorful, and rich. It’s something I could definitely make again!

smore cupcake 2

Ingredients:

2 cups Graham Cracker Crumbs
1 tbsp Light Brown Sugar
1 1/2 tsp Baking Powder
1/2 tsp Baking Soda
1/2 tsp Salt
2 Eggs
1/2 cup Honey
1 stick Butter – melted
1/2 tsp Vanilla Extract
1/2 cup Milk
1 cup Mini Chocolate Chips

Marshmallow Frosting:

1 stick Butter – room temperature
2 cups Powdered Sugar
1/2 tsp Vanilla Extract
2 cups Marshmallow Fluff
4 tbsp Heavy Cream

Smore cupcake 1

Super easy directions! Let’s go!

Directions:

Graham Cracker Crumb Cake:

1. Set oven to 350 degrees F. Line cupcake pans. Makes about 18-20 cupcakes.

2. In medium bowl combine graham cracker crumbs, brown sugar, baking powder, baking soda, and salt. (Dry Ingredients)

3. In electric mixer beat eggs and honey until combined. Add butter and vanilla. Continue to beat on medium speed.

Note: Make sure butter is melted.

4. Add dry ingredients to electric mixer. Mix on medium/high speed until combined. Add milk. Continue to mix.

5. Fold in chocolate chips.

Note: This mixture will look loose. Don’t worry. These cupcakes plump up perfectly!

6. Fill cupcake liners about 2/3 full. Bake for about 18-20 minutes.

7. Allow cupcakes to cool before frosting!

Marshmallow Frosting:

1. In electric mixer beat butter until smooth and creamy.

2. Add powdered sugar and mix on medium/high speed.

Note: It will look thick – don’t worry!

3. Add vanilla extract and continue to mix. Add marshmallow fluff and mix until combined.

4. Add heavy cream. Mix until smooth and fluffy.

5. Frost your cupcakes!

Note: I used Teddy Grahams (Honey) and mini Hershey’s chocolate bars for garnish!

smore cupcake 3

Enjoy and happy baking!!

– Bayley & Ani

Chocolate Peanut Butter Ball Cupcakes

Who doesn’t enjoy a peanut butter/chocolate combination? Aside from those with nut allergies, I’m pretty sure we’re all in agreement. Give me the peanut butter and chocolate cupcake now! Wait. I said peanut butter ball. Yes, I rolled peanut butter into a ball and placed it in the middle of a chocolate cupcake. A layer of chocolate, a peanut butter ball, and topped with another generous scoop of chocolate. After all of that action I topped this cupcake with a peanut butter cream cheese frosting. Are you in love with this recipe? In case you haven’t decided I should add I also finished it off with shaved ghirardelli dark chocolate. Have you made your mind up yet? If you’re ready to take on this excitement get your stand mixer ready and your peanut butter at hand.. Ready set go!

choco pb cupcake 2

Ingredients:

1 2/3 cups Flour
3/4 cup Unsweetened Cocoa Powder
1 tsp Baking Soda
1/2 tsp Salt
1 cup Sour Cream
2 tbsp Milk
1 tsp Vanilla Extract
1 stick Butter (8 tbsp) – room temperature
1 1/2 cups Sugar
2 Eggs

Peanut Butter Ball Filling:

1 cup Powdered Sugar
3/4 cup Peanut Butter – creamy
4 tbsp Butter – room temperature
1/2 tsp Vanilla Extract

Note: It’s best to make the peanut butter balls before the cupcake batter. I prefer making them the night before and refrigerate them overnight. Less dishes to wash!

Peanut Butter Cream Cheese Frosting:

1 8-ounce package Cream Cheese – room temperature
1 stick Butter – room temperature
1/2-3/4 cup Peanut Butter
3-4 cups Powdered Sugar

Note: Depending how peanut buttery you want your frosting you can add 1/2-3/4 of a cup to your frosting! I added about 3/4 cup.

chco pb cupcake 3

Directions:

Peanut Butter Ball Filling:

1. In electric mixer combine flour, powdered sugar, peanut butter, butter, and vanilla and beat on medium speed.

Note: Make sure mixture is well combined before rolling into balls.

2. Roll mixture into 1-inch balls and set aside on baking sheet or parchment paper.

Chocolate Cake:

1. Set oven to 350 degrees F. Line cupcake pans. Makes about 18-20 cupcakes.

2. In a medium bowl combine flour, cocoa powder, baking soda, and salt. Whisk and set aside.

3. In a small bowl or liquid measuring cup, stir together sour cream, milk, and vanilla extract. Set aside.

4. In electric mixture beat butter and sugar on medium/high speed until fluffy.

5. Beat in the eggs one at a time. Make sure to scrap down sides.

6. Begin adding flour mixture and sour cream mixture alternatively into electric mixture with butter/sugar combination. Make sure you begin and end with flour mixture.

7. Once batter is combined begin adding a generous tablespoon of the chocolate cake mixture to cupcake cups. Place a peanut butter ball in each cupcake and top with cupcake mixture. Fill about 2/3 full.

8. Bake for 18-20 minutes. Allow to cool in pan for 5 minutes before removing. Make sure cupcakes are completely cool before frosting.

Peanut Butter Cream Cheese Frosting:

1. In electric mixer beat cream cheese, butter, and peanut butter on medium/high speed until smooth.

2. Add powdered sugar one cup at a time and continue to mix on medium speed.

3. Once smooth and creamy begin frosting your cupcakes!!

choco pb cupcake 1

Enjoy this brilliantly tasty cupcake! You’ll be ready for the next!

Oh! Don’t worry about that post-cupcake workout. Ani has that covered for you!

Workout ready!

Workout ready!

Bayley & Ani

Pineapple-Carrot Cake Cupcakes

You know when you’re in the mood for something specific, but you can’t put your finger on it? That’s where I was at. I was in the mood for a sweet, yet savory cupcake. I racked my brain for a while and then decided I wanted to make a moist and flavorful carrot cake cupcake, but I wanted to jazz it up! Pineapple! Yes, I said pineapple and I promise it was a great decision. A pineapple carrot cake cupcake. Pineapple is easily one of my favorite fruits. It’s sweet, yet tangy, which adds a special touch to this carrot cake recipe.

Don’t feel too guilty about sinking your teeth into this cupcake! Just think, you’ll be getting your fruits and veggies!

Time to get started!

single cupcake carrot

Ingredients:

4 Eggs
2 cups Flour
2 cups Sugar
2 tsp Baking Powder
1 tsp Salt
1 1/2 tsp Cinnamon
1/2 tsp Baking Soda
3/4 cup Vegetable Oil
1 tsp Vanilla Extract
3 cups Carrots – finely shredded – about 6 medium carrots

Pineapple Filling:

1 Egg Yolk
1/4 cup Canned Crushed Pineapple – well drained!
3 ounces Cream Cheese – room temperature
2 tbsp Sugar
Pinch of Salt

Note: It’s very important that the pineapple is well drained.

Cream Cheese Frosting:

1 8-ounce package Cream Cheese – room temperature
1 stick Butter – room temperature
2 tsp Vanilla Extract
2-3 cups Powdered Sugar
2-3 tbsp Toasted Shredded Coconut – Optional

Note: I love coconut and wanted to add as a garnish! You could even add sprinkles.

Cupcake carrot

Directions:

1. Preheat oven to 350 degrees. Line cupcake pan. Makes about 18-20 cupcakes.

2. In a large bowl, combine flour, sugar (2 cups), baking powder, baking soda, cinnamon, and salt.

3. In electric mixer, mix eggs on medium speed. Add carrots, vanilla, and oil – continue to mix on medium/low speed.

Note: Make sure carrots are finely shred. Long thick pieces are no good.

4. Once egg mixture is combined add flour mixture. Continue to mix on medium speed.

Note: Do not fill cupcake liners before the filling is made.

Pineapple Filling:

1. In electric mixer, beat cream cheese and sugar (2 tbsp) until combined.

2. Add egg yolk and salt. Continue to beat on medium/high speed.

3. Fold in pineapple.

Filling cupcake liners-

4. Add 1 tbsp of cupcake mix.

5. On top of the cupcake mix, add 1 tsp of pineapple filling.

6. Fill remainder with cupcake mix (over top of pineapple filling) about 2/3 full.

7. Bake for 20 minutes. Allow cupcakes to cool before frosting.

Cream Cheese Frosting:

1. In electric mixer, add cream cheese and butter. Beat until combined and smooth.

2. Add powdered sugar one cup at a time. Mix on medium/high speed until creamy.

3. Add vanilla extract and continue to mix.

4. Once everything is combined – frost your cupcakes! But make sure they’re cool!

Toasted Coconut: (2 Methods)

Oven Method-

1. Set oven to 325 degrees. Should take about 5-6 minutes to toast coconut.

2. Place coconut on a cookie sheet. Make sure to spread it out.

3. Stir every couple minutes to prevent the coconut from burning. Should be slightly browned.

4. Remove from oven and allow to cool for a few minutes.

Stove Top Method-

1. Place coconut in a skillet oven medium heat.

2. Stir frequently until coconut is slightly browned.

3. Remove from heat and transfer to bowl or plate. Allow to cool.

plate cupcake carrot

These cupcakes are great with Easter right around the corner. Enjoy this recipe and have fun!

ani heartThis princess is already licking her lips! Tasty cupcakes!

Bayley & Ani